During the production of my music video I
encountered many problems along the way, which I needed to overcome, these
problems were for the most part out of my control and I was forced to work
around them in order to complete my production. Initially I intended to use a
range of actors for my production however even though I asked them a minimum of
2 weeks prior to filming they became unavailable just before I intended to
shoot my footage and eventually refused to cooperate, I did however have backup
actors in the event of this occurring however they were also unavailable due to
other engagements. So the first problem that I needed to work around was the lack
of willing participants as I was forced to alter my idea and concept for my
video to something that could be achieved solo. I also had to change my planned
locations to suit my needs so I had to spend more time location scouting in
order to find a suitable location for my production, as I was forced to resort
to using a contingency that I had planned out in the event that I couldn’t
follow through with my original idea due to any problems that might have
occurred such as the lack of actors/locations.
Even with the problems I was able to find a suitable location, which I
could film in, as my contingency involved the use of ambient shots of nature
and scenery I chose to film in a local woodland area, which was public land and
thus did not require me to acquire permission to film there however I did take
care not to film any residencies or locals that might happen to have been
walking around. I also planned to shoot there on multiple days in order to
acquire different footage and with different light and weather conditions,
although this proved to be a problem in itself as some days when I planned to
go out and film the weather provided insufficient light conditions as it was
overcast or it rained heavily which would have made the area inaccessible, so I
needed to then plan around these problems as well during production, even
though this problem was out of my control it was still an inconvenience which I
needed to work around. Throughout the process while there were problems that
hindered my production I was able to work around them and ultimately get the
footage I required, if I were to go through with this production in the future
I would firstly require any actors I needed to sign a contract which would
secure their participation in order to avoid encountering the same problems I
had during this production, I would also try to avoid a concept that would
require a complex location or a mass of props for the production as this proved
to be a problem for me as well, so in future I will try and use resources
available to me such as I did with my contingency plan during this production.
Overall however I think that the production went well and even though I needed
to alter my plans constantly I had put a backup plan in place which made it
easier for me to work around these problems and likely saved my production.
Sunday, 30 June 2013
Music Video Evaluation - Editing Skills
I
think that the editing process for my music video production was rather
successful as during the process I found myself using techniques which I had
not used before and I found myself trying out new effects which I hadn’t considered
before which I wound up trying out on my footage which in the end produced a
decent final product. The initial stages of the editing process were slow as I
needed to gather up all of my footage and import it into the Bins for me to
access, I started to piece the footage together and for most of it I needed to
trim it down to just a few seconds per shot, as I pieced it together I
initially used jump cuts for all of my footage, however later I decided to add
a few dissolving transitions into the sequence just to separate the footage a
bit. Along with the jump cuts and dissolve transitions I decided to use
“Adjustment Layers” which I had never used before and I had only recently
learned how to use them, I placed 2 adjustment layers over the entirety of my
video so that I could cut it wherever I needed, these allowed me to add
multiple effects to my footage without actually altering the original clips which
made it easier for me to view and change effects as I could toggle them on or
off which speeded up the process immensely. Using these adjustment layers I
decided to add a soft light blend mode onto all of my footage to make it seem
brighter and more saturated which seemed to have improved the visual quality, I
also had to make some changes to a few clips of footage such as sharpening them
to a degree as they appeared blurry and the adjustment layers allowed me to
view the effect that this had, however if I tuned the sharpness too high the
footage started to distort so I had to keep it to a very low percentage. Some
of my footage was also quite shaky as it had been filmed handheld so I
corrected this by using a “Warp Stabilizer” effect which made the motion
smoother and more stable, while doing this however there were times when it
crashed the program and I had to restart and add this effect again but after a
while it seemed to correct itself. During the process I’ve found out how to use
a wider variety of editing techniques that have made it much easier and faster
to edit my footage and I have learned how to speed up the editing using effects
which I can change and alter without having to restart if the effect doesn’t work
on my footage, I think that overall the editing process has gone well however I
think that I could have used more transitions between shots instead of simply
using jump cuts as that would have made the video flow smoother and the use of
the adjustment layers could have been utilized to a greater extent as it
allowed me to do so much more with my footage without fear of ruining the
original clip, in future I should make better use of this as well as effects
that improve the quality of my footage. To improve I should likely practice
editing using these new techniques in order to gain a better understanding of
them and this will hopefully help me during future productions.
Music Video Evaluation - Finished Product
My finished music video production in my opinion turned out better than I
expected in my opinion, during the process I had to change many of my plans due
to unavailability of willing participants and lack of available locations so I
needed to quickly change my concept because of these complications. Initially
my idea for the production was more complex which I thought would be more
visually appealing, however because I was forced to resort to my contingency I
had to plan out an entirely different production, although this did turn out
better than I expected. I think that the finished product looks more visually
appealing than I expected and the music is timed quite well, although one thing
I don’t particularly like is that during playback of the finished video there
are sometimes sections where the screen will become static and it will become
blurry and lines will appear over most of the screen however I would put this
down to an error whilst I was exporting the film. I think that for a
contingency plan it came out well as I managed to obtain a variety of different
shots of ambient footage which I could use, and with the chosen style of music
the shots fit in well, the upbeat positive music along with tranquil shots of
nature work well together as the video seems to flow naturally along with the
music, which in turn makes the video seem natural as it progresses, and the
effects I used work well as the shots transition into each other along with the
jump cuts that I used. The fact that there is no clear narrative in my finished
product seems to have worked out better than I expected as well as I was able
to focus more on getting more visual shots such as close ups and wide
establishing shots which would act as the set up for my other footage and this
has worked well for me, the video seems to flow nicely with the music and while
it makes the video look more simplistic it still appears visually interesting.
If
I were to recreate this I the future I would consider developing a concept that
could be applied to the video such as contrasting shots of nature with
industrial sites, that could add a greater depth and meaning to the video which
could improve it visually and make it seem more interesting. I also think that
I would need to gather a wider variety of shots and from during different times
of the day to give me a greater range of footage and lighting conditions that I
could make use of to improve the video and make it more visual. Another aspect
I could improve on is the amount of effects I use to alter the footage as some
effects either seem ineffective or just don’t look appealing which I think
could be improved upon as it could make my footage look clearer, more
colourfull and more aesthetically pleasing. Also for my finished product I had
to cut the audio short as I had an insufficient amount of useful footage so I
needed to remove at least 30 seconds of the audio in order to make the finished
product seem to flow normally, to improve on this I would shoot a greater
capacity of footage in order to use the full extent of the audio I choose for
the video.
Overall I think that the finished product turned out to be more visually
interesting than I had expected, considering I needed to rethink my ideas
during the planning process and ultimately go with a contingency planned seems
to have worked out for the better as my video flows well with the music, has a
variety of different ambient shots that fits in with the style of music, and it
looks visually interesting as the video goes on. While I do think that it could
use some improvement I believe it has turned out well and I think that I made
the right decision when I made the contingency plan with this idea in mind as
it made the process much simpler and easier to achieve in a shorter timeframe,
which was essential as I had to perform the production solo, however the
finished product surpassed my expectations and I think that it has been done
well, although if given the opportunity I would improve it however as it stands
I am generally pleased with the finished production.
Saturday, 29 June 2013
Music Video Final Film
This is my finished production of my music video.
Music Video Production from Lewis Mercer on Vimeo.
Song: "Kafuka Fuura" composed by Hasegawa Tomoki
Music Video Production from Lewis Mercer on Vimeo.
Song: "Kafuka Fuura" composed by Hasegawa Tomoki
Monday, 17 June 2013
Editing Decision Log - Music Video Production
This is a log of all the effects and
changes I will be making to my film during the editing process on my Music Video production, the effects I
will be using and the time that they are in effect on the specified section of
the film.
Time in seconds and Effect(s) used
0:02-0:03 Cross Dissolve
0:07:00-0:07:15 Cross Dissolve
0:00-0:18 Warp Stabilizer, Soft Light
Blending mode
0:10-0:10:17 Cross Dissolve
0:23-0:25 Sharpen 20pts
0:36-0:39 Sharpen 20pts
0:49-0:49:03 Cross Dissolve
0:49-0:50 Sharpen 20pts, Warp Stabilizer
0:50-0:50:03 Cross Dissolve
0:50-0:53 Warp Stabilizer
0:53:05-0:53:08 Cross Dissolve
0:54-0:56 Warp Stabilizer
1:06-1:12 Warp Stabilizer, Soft light
Blending mode
1:40-1:47 Warp Stabilizer
2:05-2:08 Sharpen 20pts, Lighten Blend mode
2:09-2:15 Brightness and Contrast,
Brightness -20pts
2:16:05 – 2:16:09 Cross Dissolve
2:21:12 – 2:22:00 Cross Dissolve
2:25-2:26 Fade to Black
2:25-2:27 Audio - Exponential Fade
0:00-2:27 Adjustment Layer 2 - Soft Light
Blending Mode
Friday, 14 June 2013
Editing Tutorial - Adjustment Layer
During the Editing process it is sometimes required to add various effects to your footage to make them seem more visually appealing such as a black and white effect or a slight change to the shots sharpness. Through a YouTube tutorial -http://www.youtube.com/watch?v=0J9NpkbejUk I found that it is possible to create something called an "adjustment layer" that is a separate track to your footage that you can use to add multiple effects onto the footage without altering the original clip, and you are able to toggle this layer on or off to see the different effects it could have on your footage. I thought that this would be quite useful especially during any editing I might do so I decided to test this out.

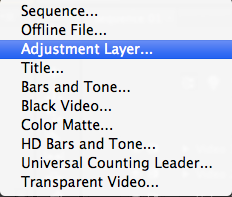
The first step was to select the "new item" icon at the bottom of the project window and select "new Adjustment Layer" which would then be placed in one of the bins as a movable item similar to a clip of footage, which could then be dragged onto the video pane of the timeline.


The use of an adjustment layer could prove very useful as it allows multiple effects to be placed on a single piece of footage without actually altering the original so it can be used to see different effects without changing the original clip which would otherwise take time to restore if the effect didn't work out, and with the adjustment layers the different effects can be changed and altered easier to suit different needs.


The first step was to select the "new item" icon at the bottom of the project window and select "new Adjustment Layer" which would then be placed in one of the bins as a movable item similar to a clip of footage, which could then be dragged onto the video pane of the timeline.

the next step would be to select the adjustment layer and then go to "Effect Controls" which would bring up a window where you could alter the opacity and blend mode for the new adjustment layer, then you could either alter the adjustment layers initial settings or drag any effect onto the layer to then alter that to suit your needs, as each effect that is dragged onto the adjustment layer would show up in the effect controls menu.
 |
| The effect controls menu that shows all of the adjustments that can be made |
 |
| As an example I used the warp stabiliser effect which then showed up on the effect controls menu of the adjustment layer |

Thursday, 13 June 2013
Music Video - Bin Labelling
Before I could start editing the footage for my music video I first needed to organise and label the Bins that held the footage so I would know exactly what piece of footage it was and where it was stored to make the editing process easier.
 |
| I decided to organise all of my footage from each shoot into a folder and label it so I knew which folder had the correct footage inside, and from each shoot I performed. |
 |
| This is the shots inside the folder labelled "Main Shots" which holds the bulk of the footage I will be using during editing, I changed the name of all of the footage which I would be using to something recognizable such as using simple words and numbers that would separate the shots. |
 |
| This is the second folder labelled "Main shots 2" which holds all of the footage taken from a different day and I have labelled each piece of footage in a similar way to the previous folder in order to recognise it during editing. |
Subscribe to:
Posts (Atom)