Continuity editing is the connecting of action in different locations during a film sequence and it uses techniques such as the 180 degree rule and shot reverse shot, these techniques help show parallel action thing lace in different locations in a scene and cross cut between each other to give a scene a sense of narrative. One of the earliest directors to understand these editing techniques was U.S director D.W Griffith who mastered the use of cross cutting to create parallel action in different locations and codifying film grammar in other ways. His work during 1913-1919 was highly regarded as being a great influence to peoples understanding of early editing techniques.
This footage is our attempt at creating the shot reverse shot effect while applying the 180 degree rule, we shot this footage in order to edit together at a later point as a means to practice our skills and understanding with continuity editing techniques. These two pieces of footage show how by moving the camera to face each subject then, if edited together it would seem like a natural conversation between the subjects and the camera would focus on each subject as they were speaking.
Continuity 1 from Lewis Mercer on Vimeo.
Continuity 2 from Lewis Mercer on Vimeo.
Thursday 25 October 2012
Monday 22 October 2012
Filming for Editing: Kuleshov Effect
During the time in the studio the main aim was to film film footage that we could use for practicing editing techniques such as continuity editing and the Kuleshov experiment. Firstly we started by filming a shot of our subject and then shot three different subjects/objects in order to edit together to replicate the Kuleshov experiment, The footage would be edited in a way that the shot of the subject would be intercut with shots of the three different subjects/objects and would cut back to the exact same shot of the first subject, this is to show that through editing the same shot when shown in juxtaposition with different things can communicate various meanings to the audience.
The above images are shots taken from the footage that we would be using, each shot of an object is going to be edited to be intercut with the shot of the subject to replicate the Kuleshov experiment to create meaning from the juxtaposition of different images wit the subject even though the shot of the subject remains unchanged. During the filming process we attempted to try and use similar objects/subjects as in the original Kuleshov experiment one example being Shot 4: Object 3, the bowl of soup.
The footage below is all of these shots intercut with each other to create an imitation of the Kuleshov experiment to give different meaning to a single shot through the use of what context is given with it through the image that is intercut with it.
Kuleshov effect full from Lewis Mercer on Vimeo.
 |
| Shot 1: Subject |
 |
| Shot 2: Object 1 |
 |
| Shot 3: Object 2 |
 |
| Shot 4: Object 3 |
The above images are shots taken from the footage that we would be using, each shot of an object is going to be edited to be intercut with the shot of the subject to replicate the Kuleshov experiment to create meaning from the juxtaposition of different images wit the subject even though the shot of the subject remains unchanged. During the filming process we attempted to try and use similar objects/subjects as in the original Kuleshov experiment one example being Shot 4: Object 3, the bowl of soup.
The footage below is all of these shots intercut with each other to create an imitation of the Kuleshov experiment to give different meaning to a single shot through the use of what context is given with it through the image that is intercut with it.
Kuleshov effect full from Lewis Mercer on Vimeo.
Wednesday 17 October 2012
Filming for Editing: Evaluation
After this session in the studio filming in order to practice editing techniques I've found that when shooting in low key lighting it's very difficult to get the right amount of light that is needed to provide an acceptable looking shot, as during filming I found that without the correct amount of light or a poor backdrop creates a variety of problems such as the background being too reflective or shadows covering the entirety of the backdrop. However I've also found that when filming for editing specific things need to be considered such as the 180 degree rule as it was a trial to get the framing just right whilst using the 180 degree rule although it did provide decent footage and in addition filming to create the Kuleshov effect was taxing as we constantly had to adjust our cameras and equipment, the backdrop or the subject and we had to use long takes to provide us with enough footage to give us as many options as possible for when we edit the footage together. This filming session was basically an experiment to practice filming footage with which we could then practice our editing skills by shooting certain things that wold be required to edit using different effects such as the Kuleshov effect and the 180 degree rule, which we tried to replicate as accurately as possible e.g. using similar objects used in the Kuleshov experiment such as a bowl of soup to intercut with a shot of our subject.
Overall aside from a few minor problems during the process we have managed to get decent footage which we can now use for editing later on to provide examples of the 180 degree rule and Kuleshov experiment, which we could then utilise for other pieces of footage that could provide us with better quality film that looks appealing and provides narrative.
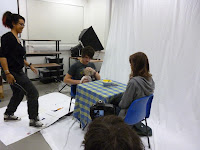
These are shot taken whilst we were filming to show our process.


Overall aside from a few minor problems during the process we have managed to get decent footage which we can now use for editing later on to provide examples of the 180 degree rule and Kuleshov experiment, which we could then utilise for other pieces of footage that could provide us with better quality film that looks appealing and provides narrative.
These are shot taken whilst we were filming to show our process.


Filming for Editing: Problems
Whilst in the studio during the time we were filming footage that we could use for editing purposes and to practice editing techniques like the Kuleshov effect we came across a variety of problems during filming. Firstly one of the problems we soon discovered was that since we were using a small light source as our key light in a darkened room, the backdrop we were using wouldn't be suitable as it was white and would reflect the light too much and overexpose the subject. We attempted to solve this problem by switching to using a black sheet of cloth as our backdrop however this was still too reflective as it created large shadows directly behind the subject which was unacceptable, in the end we found that using black cardboard sheets proved to be a better backdrop as it didn't reflect the light and could cover the entire background of the subject. A minor problem that occurred whilst filming with this cardboard backdrop was that people were required to hold it in place as it was large enough to cover the space behind the subject but small enough that it needed people to hold it in place, and when we were filming it kept moving out of place and creating gaps and shadows which was irritating as we needed to stop and adjust it each time, although eventually we did manage to find a suitable way to keep each piece in place long enough to shoot a scene by holding two pieces of black card at the side of the subject and two just behind to give it the appearance of a completely flat background.
Another problem we encountered was when trying to film if the camera was left for a certain amount of time it would shut off the preview screen which every time we needed to turn on again and readjust the focus to ensure that the scene looked right before filming, this was more of an annoyance than a problem but it still took a small portion of time each instance where it turned off to switch it back on, it could be easily resolved by changing the cameras settings however so for future shoots one more thing we will need to check before filming is the cameras auto shut off setting so that we don't need to waste time changing the setting later on or switching it back on every minute. One additional issue we had was with the camera tripod, as during the process we needed to constantly readjust it to make it either higher or lower or we needed to move the camera and the tripod was bad quality as even though it was securely fastened it was either uneven or the platform for the camera moved slightly putting the camera off balance which again caused us to stop and fix it before filming as with the camera being off balance it would alter the angle of the shots so again it was more of an annoying minor fix than a major problem.
Another problem we encountered was when trying to film if the camera was left for a certain amount of time it would shut off the preview screen which every time we needed to turn on again and readjust the focus to ensure that the scene looked right before filming, this was more of an annoyance than a problem but it still took a small portion of time each instance where it turned off to switch it back on, it could be easily resolved by changing the cameras settings however so for future shoots one more thing we will need to check before filming is the cameras auto shut off setting so that we don't need to waste time changing the setting later on or switching it back on every minute. One additional issue we had was with the camera tripod, as during the process we needed to constantly readjust it to make it either higher or lower or we needed to move the camera and the tripod was bad quality as even though it was securely fastened it was either uneven or the platform for the camera moved slightly putting the camera off balance which again caused us to stop and fix it before filming as with the camera being off balance it would alter the angle of the shots so again it was more of an annoying minor fix than a major problem.
The 180 Degree Rule
The 180 degree rule in filmmaking terms is the spatial relationship between a character and another character or object within a scene. An imaginary line called the axis connects the characters and by keeping the camera on one side of this axis for every shot in the scene, the first character will always be framed right whereas the second character or object will always be framed left. If the camera passes over the line it is known as crossing the line or jumping the line.

The 180 degree rule allows the audience to visually connect with unseen movement happening around and behind the immediate subject and is important or the narration of films, avoiding crossing the line is a problem as if for example a character is framed on the right side of the scene, crossing the line and using a jump cut to now show that character on the left side would disorientate the audience, however sometimes the rule can be occasionally broken if the aim is to create a sense of disorientation for the audience.

The 180 degree rule allows the audience to visually connect with unseen movement happening around and behind the immediate subject and is important or the narration of films, avoiding crossing the line is a problem as if for example a character is framed on the right side of the scene, crossing the line and using a jump cut to now show that character on the left side would disorientate the audience, however sometimes the rule can be occasionally broken if the aim is to create a sense of disorientation for the audience.
Tuesday 16 October 2012
Filming for Editing: Summary
15th October 2012
Summary
As part of our New Wave project one aspect that we had not yet looked at was editing so we decided that our next step was o film some footage that could be used to utilise certain editing techniques. To begin we wanted to shoot footage that would be appropriate during editing to make use of the "Kuleshov experiment" where a single shot of an actor is used in juxtaposition of various images that the audience obtain different meaning from, during editing the footage will have the shot of the actor intercut with these different images to convey different meaning and emotion behind the images. To reference the initial Kuleshov experiment we used similar images to be intercut with the actor, a skeleton, a bowl of soup and a doll, which are similar when compared to the original Kuleshov experiment which used a casket, a bowl of soup and a woman to represent different feelings that the audience could interpret.
We also decided to shoot footage that could be used to create continuity editing and that applied to the 180 degree rule, where the action in the scene always takes place at the front and the camera never crosses a 180 degree line, so over the shoulder shots can be used to show different points of a conversation for example. The scene we set up was a simple conversation by two people at a table so we could shoot both of the subjects from either over the opposite subjects shoulder or from behind them so that we can edit the footage to jump cut between the two, shot reverse-shot, to give it the appearance that the conversation is jumping between the two subjects as in reality, while also obeying the 180 degree rule.
Equipment List
For these practices in Filming for Editing techniques we would be in the lighting studio which is an enclosed space and could contain various hazards which would be detrimental to crew safety, and the risks involved with working with equipment in such enclosed areas is posed also and these hazards must be observed and resolved before filming could commence. The hazards that could pose a danger are as follows:
Summary
As part of our New Wave project one aspect that we had not yet looked at was editing so we decided that our next step was o film some footage that could be used to utilise certain editing techniques. To begin we wanted to shoot footage that would be appropriate during editing to make use of the "Kuleshov experiment" where a single shot of an actor is used in juxtaposition of various images that the audience obtain different meaning from, during editing the footage will have the shot of the actor intercut with these different images to convey different meaning and emotion behind the images. To reference the initial Kuleshov experiment we used similar images to be intercut with the actor, a skeleton, a bowl of soup and a doll, which are similar when compared to the original Kuleshov experiment which used a casket, a bowl of soup and a woman to represent different feelings that the audience could interpret.
We also decided to shoot footage that could be used to create continuity editing and that applied to the 180 degree rule, where the action in the scene always takes place at the front and the camera never crosses a 180 degree line, so over the shoulder shots can be used to show different points of a conversation for example. The scene we set up was a simple conversation by two people at a table so we could shoot both of the subjects from either over the opposite subjects shoulder or from behind them so that we can edit the footage to jump cut between the two, shot reverse-shot, to give it the appearance that the conversation is jumping between the two subjects as in reality, while also obeying the 180 degree rule.
Equipment List
- 1 Canon 5D DSLR camera
- 1 Tripod
- 1 Compact digital stills camera
- 3 SD memory cards of 8GB or higher
- Miniature Studio light with "Barndoors"
For these practices in Filming for Editing techniques we would be in the lighting studio which is an enclosed space and could contain various hazards which would be detrimental to crew safety, and the risks involved with working with equipment in such enclosed areas is posed also and these hazards must be observed and resolved before filming could commence. The hazards that could pose a danger are as follows:
- Limited work space, danger of falling and causing injury to oneself or others
- Risk of tripping on cables and wires across floor
- Risk of being burnt by studio lights
- Risk of studio lights falling on crew members
- Risk of damage to camera equipment
- Risk of damage to lighting equipment
- Risk of fire
- Being cautious of surroundings while in the studio area
- Ensuring all cables/wires that may run across floor are kept in clear visibility
- Ensuring that crew do not make unnecessary physical contact with each other to avoid injury from tripping/falling/other
- No inappropriate behaviour in the studio such as running
- Ensuring all equipment is securely fastened or locked into place e.g. tripods etc. to avoid damage to equipment or injury from equipment falling on crew members
- Being cautious whilst handling equipment such as cameras and especially the studio lights to avoid damage/injury
- Ensuring there is easy access to a fire escape in case of fire
The Kuleshov Effect
During the 1920's Lev Kuleshov was among the first to theorise that the essence of cinema was the editing of a film, the juxtaposition of one shot to another. He created an experiment using montage that lead the viewer to reach certain conclusions about the action in a film, the viewers infer meaning based on the context of the situation. His now famous "Kuleshov experiment" uses shots of an actor that were intercut with meaningful images (a casket, a bowl of soup, a woman etc.) in order to show how editing images changes viewers interpretations depending on the context given, as they would infer their own meaning onto the images.


These images manage to convey different emotions to the audience and they interpret them in a different way each time depending on the image intercut with the shot of the actor, even though the image of the actor is the same shot reused with different context the audience still interprets it in a different way to convey meaning.
Monday 15 October 2012
3rd Outing: Tracking Shots
On the 3rd time we went out filming we realised we needed tracking shots that could capture some of the conventions of new wave, so we decided to choose a location that could capture the essence of a social issue affecting the local area such as unemployment. We decided to capture some static tracking shots initially just to determine if the way we were shooting the footage and the location would work out the way we hoped. The footage is new wave in the fact it is filmed in a location that reflects a social issue and we were using only one camera, as we have no budget similar to French New Wave films that are filmed with little or no budget at all.
static tracking shots from Lewis Mercer on Vimeo.
The footage is comprised of shots from two different viewpoints and angles, and I edited it together to give it the appearance of a quick cut, a technique often used in New Wave films, the footage is also shot in high contrast monochrome, another convention of French New Wave, also because the footage was shot in a local area with real peoples reactions to the camera being captured. the footage shows a subject walking through an area that has many rundown shops that have gone out of business to highlight the possible social issue of unemployment in the area.
OH&S: Occupational Health and Safety
During this outing we would be out in public filming shots for our New Wave project and there would be a various amount of safety concerns that we would need to address before we commenced filming as we would be carrying expensive filming equipment and would be in a high traffic area with a large amount of people in the vicinity so we would need to be aware of the various hazard that could occur during the shoot.
- High volume of traffic that could prove dangerous
- Be aware of the locations reputation e.g. is it known to have high crime rates
- Risk of injury due to falling/dropping equipment/being knocked by passers by/ being hit by traffic/misconduct
- Risk of being hit by traffic as it was a busy area built up area
- Risk of being mugged/robbed
- Risk of dropping/damaging equipment
- Risk of injuring other people through dropping equipment/misconduct
- Always travelling in groups to avoid being mugged/robbed in public
- Share the equipment equally so no one person is over encumbered and risks dropping the equipment and damaging it
- Take caution whilst travelling directly next to the road to avoid falling and being hit by oncoming traffic
- Ensure that the camera and equipment is never left unattended
- Ensure that whilst filming no passers by accidentally knock over or damage any equipment
- Ensure that whilst filming you are in a relatively open area and easily visible to avoid getting in the way of other people trying to get past
- If and wherever possible film from a location that is out of the way and will cause the least disruption to other people around you
- Ensure that all equipment is secured in a safe manner before commencing filming and packed away whilst travelling to a new posit or location
Montage Editing
 |
| Sergei Eisenstein (1898-1948) |
Wednesday 10 October 2012
2nd Outing: Camera Movements
During the time that we were filming on location for the second time, we decided to take some shots from an escalator to try and get some interesting camera movements, we had a subject go up and down on as set of escalators and had the camera placed either in front of or behind them, to capture the movement of the subject whilst remaining in focus, and to create a simple, interesting tracking shot.
escalator footage from Lewis Mercer on Vimeo.
This technique is considered a New Wave camera movement because it is using innovative use of the environment to create a tracking shot of the subject in an interesting way, and also because this technique requires no other special equipment and simply uses modes of transport already present in the environment to its advantage.
This footage is similar to a scene in Jean-Luc Godard's film "Breathless" where the camera is placed on an escalator facing a woman who is travelling up them which then turns to a tracking shot, so we were trying to recreate that in our footage by using a new wave technique.

OH&S: Occupational Health and Safety
During the filming of this scene and while practicing this technique there were a few health and safety concerns that needed to be addressed as both the subject and the person operating the camera would be on a moving platform, and there would be other people around them as they were in a public area. These hazards include:
- Both the subject and camera operator would be on a moving surface and could slip/fall and/or injure others nearby
- They would be holding expensive equipment and would be at risk of damaging it
- Risk of falling on the escalator
- Risk of injuring themselves and/or others
- Behaving appropriately whilst on the escalators
- Ensure that the subject and camera operator are standing firmly on the escalator
- Ensure that either the subject or camera operator has one hand on the railing for support to avoid loss of balance whilst either ascending or descending
- Ensure that no other people are in very close proximity to the subject/ camera operator whilst filming.
- Consider that other people will be around during filming and that crew members should stay a safe distance from them whilst on the escalators.
Tuesday 9 October 2012
Lighting Examples: Edge
The last lighting technique we attempted was the use of Edge lighting which creates a very high contrast between the light and dark areas of a subject, and exaggerates shadows and has very little highlights or illumination to give the subject an almost sinister, mysterious appearance. We tried to create this lighting by using a small source of light to create a hard lighting effect that would only highlight a small part of the subject while the rest would be cast in shadow, our footage shows how the shadows cover more than half of the subjects face and there is only a small glimmer of light from the subjects eye which makes the subject look almost mysterious.
Edge light ex from Lewis Mercer on Vimeo.
This lighting technique is also used in New Wave films, again because its shot in high contrast monochrome, but also because of the effect it has on the subject, by maxing their features in shadow it creates a mysterious effect on the subject, and makes the subject seem darker, almost more cynical which could be seen in certain new wave films such as Jean luc Godards "Breathless" (1960). These lighting techniques are also new wave because they were low budget films so shots that have lighting that only requires one light source would be easier to film on a small budget.
 This is a screenshot from Godards film "Breathless" which shows edge lighting in effect on this character to cover his facial features in shadow.
Edge light ex from Lewis Mercer on Vimeo.

Lighting Examples: Butterfly
Another lighting technique we were to put into practice is "Butterfly" lighting which was often used in Hollywood films of the 50's, its used to flatter the subject and make them more attractive so it would most likely have been used on female subjects. We tried to practice this by also using a female subject and our footage shows how it affects the subjects facial features as it adds shadow under the subjects cheek bones and over their eyes which illuminates the subjects face making it more striking.
Butterfly Light ex from Lewis Mercer on Vimeo.
This footage is also new wave in the fact that it is shot in high contrast monochrome that would be present in many French new wave films of the 1950-60's. The lighting highlight the subjects features in a way that makes them more attractive, which is often present in French new wave films as if there was a female actress as the subject the lighting technique would generally be used to make them look attractive. It is also used because butterfly lighting only requires a main light source which is useful for new wave films since it can be done on a small budget. A vague example of butterfly lighting would be in Jean-Luc Godard's film "Breathless" whenever the female character is on screen.

Monday 8 October 2012
Lighting Examples: Rembrandt
This is our footage of when we attempted to produce the Rembrandt lighting technique, we tried to adjust the brightness of the key light and the position of the reflector to try and discern what effects it had on the images appearance, as well as how effectively we could produce this lighting technique. The way you can determine that this technique is Rembrandt lighting is that half of the subjects face is un-illuminated but has a small triangular piece of light under the subjects eye to highlight their features a small amount.
Rembrandt light ex from Lewis Mercer on Vimeo.
This footage contains elements of new wave as it is shot in high contrast monochrome, much like the films of the French new wave, the lighting used creates a stark contrast between highlights and shadow on the subject, which this technique is often used in French new wave films due to it also only requiring one light source so it is ideal for a small budget. This technique can be seen, if not vaguely in Francois Trauffants film "the 400 Blows", the subjects face is only half illuminated with a small triangle of light on the un-illuminated side.

Thursday 4 October 2012
Lighting Evaluation
Summary
Through all of the problems that we had to deal with during the process of our lighting session overall we managed to perform the three different lighting techniques:Rembrandt,Edge and Butterfly lighting, and to an extent they went rather well, we managed to pull off these new techniques in order to use them later on in actual film shoots which would improve our footage greatly, especially if we are shooting a new wave film a it requires high contrast lighting such as Rembrandt or Edge. These new techniques we have practiced are going to help us better light our film scenes to improve the overall quality of them.


Through all of the problems that we had to deal with during the process of our lighting session overall we managed to perform the three different lighting techniques:Rembrandt,Edge and Butterfly lighting, and to an extent they went rather well, we managed to pull off these new techniques in order to use them later on in actual film shoots which would improve our footage greatly, especially if we are shooting a new wave film a it requires high contrast lighting such as Rembrandt or Edge. These new techniques we have practiced are going to help us better light our film scenes to improve the overall quality of them.


Subscribe to:
Posts (Atom)