I
think that the editing process for my music video production was rather
successful as during the process I found myself using techniques which I had
not used before and I found myself trying out new effects which I hadn’t considered
before which I wound up trying out on my footage which in the end produced a
decent final product. The initial stages of the editing process were slow as I
needed to gather up all of my footage and import it into the Bins for me to
access, I started to piece the footage together and for most of it I needed to
trim it down to just a few seconds per shot, as I pieced it together I
initially used jump cuts for all of my footage, however later I decided to add
a few dissolving transitions into the sequence just to separate the footage a
bit. Along with the jump cuts and dissolve transitions I decided to use
“Adjustment Layers” which I had never used before and I had only recently
learned how to use them, I placed 2 adjustment layers over the entirety of my
video so that I could cut it wherever I needed, these allowed me to add
multiple effects to my footage without actually altering the original clips which
made it easier for me to view and change effects as I could toggle them on or
off which speeded up the process immensely. Using these adjustment layers I
decided to add a soft light blend mode onto all of my footage to make it seem
brighter and more saturated which seemed to have improved the visual quality, I
also had to make some changes to a few clips of footage such as sharpening them
to a degree as they appeared blurry and the adjustment layers allowed me to
view the effect that this had, however if I tuned the sharpness too high the
footage started to distort so I had to keep it to a very low percentage. Some
of my footage was also quite shaky as it had been filmed handheld so I
corrected this by using a “Warp Stabilizer” effect which made the motion
smoother and more stable, while doing this however there were times when it
crashed the program and I had to restart and add this effect again but after a
while it seemed to correct itself. During the process I’ve found out how to use
a wider variety of editing techniques that have made it much easier and faster
to edit my footage and I have learned how to speed up the editing using effects
which I can change and alter without having to restart if the effect doesn’t work
on my footage, I think that overall the editing process has gone well however I
think that I could have used more transitions between shots instead of simply
using jump cuts as that would have made the video flow smoother and the use of
the adjustment layers could have been utilized to a greater extent as it
allowed me to do so much more with my footage without fear of ruining the
original clip, in future I should make better use of this as well as effects
that improve the quality of my footage. To improve I should likely practice
editing using these new techniques in order to gain a better understanding of
them and this will hopefully help me during future productions.
Showing posts with label Unit 31: Development and Techniques of Film Editing. Show all posts
Showing posts with label Unit 31: Development and Techniques of Film Editing. Show all posts
Sunday, 30 June 2013

Saturday, 29 June 2013
Music Video Final Film
This is my finished production of my music video.
Music Video Production from Lewis Mercer on Vimeo.
Song: "Kafuka Fuura" composed by Hasegawa Tomoki
Music Video Production from Lewis Mercer on Vimeo.
Song: "Kafuka Fuura" composed by Hasegawa Tomoki
Monday, 17 June 2013
Editing Decision Log - Music Video Production
This is a log of all the effects and
changes I will be making to my film during the editing process on my Music Video production, the effects I
will be using and the time that they are in effect on the specified section of
the film.
Time in seconds and Effect(s) used
0:02-0:03 Cross Dissolve
0:07:00-0:07:15 Cross Dissolve
0:00-0:18 Warp Stabilizer, Soft Light
Blending mode
0:10-0:10:17 Cross Dissolve
0:23-0:25 Sharpen 20pts
0:36-0:39 Sharpen 20pts
0:49-0:49:03 Cross Dissolve
0:49-0:50 Sharpen 20pts, Warp Stabilizer
0:50-0:50:03 Cross Dissolve
0:50-0:53 Warp Stabilizer
0:53:05-0:53:08 Cross Dissolve
0:54-0:56 Warp Stabilizer
1:06-1:12 Warp Stabilizer, Soft light
Blending mode
1:40-1:47 Warp Stabilizer
2:05-2:08 Sharpen 20pts, Lighten Blend mode
2:09-2:15 Brightness and Contrast,
Brightness -20pts
2:16:05 – 2:16:09 Cross Dissolve
2:21:12 – 2:22:00 Cross Dissolve
2:25-2:26 Fade to Black
2:25-2:27 Audio - Exponential Fade
0:00-2:27 Adjustment Layer 2 - Soft Light
Blending Mode
Friday, 14 June 2013
Editing Tutorial - Adjustment Layer
During the Editing process it is sometimes required to add various effects to your footage to make them seem more visually appealing such as a black and white effect or a slight change to the shots sharpness. Through a YouTube tutorial -http://www.youtube.com/watch?v=0J9NpkbejUk I found that it is possible to create something called an "adjustment layer" that is a separate track to your footage that you can use to add multiple effects onto the footage without altering the original clip, and you are able to toggle this layer on or off to see the different effects it could have on your footage. I thought that this would be quite useful especially during any editing I might do so I decided to test this out.

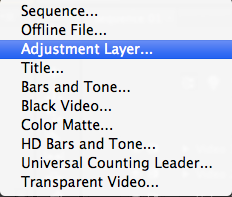
The first step was to select the "new item" icon at the bottom of the project window and select "new Adjustment Layer" which would then be placed in one of the bins as a movable item similar to a clip of footage, which could then be dragged onto the video pane of the timeline.


The use of an adjustment layer could prove very useful as it allows multiple effects to be placed on a single piece of footage without actually altering the original so it can be used to see different effects without changing the original clip which would otherwise take time to restore if the effect didn't work out, and with the adjustment layers the different effects can be changed and altered easier to suit different needs.


The first step was to select the "new item" icon at the bottom of the project window and select "new Adjustment Layer" which would then be placed in one of the bins as a movable item similar to a clip of footage, which could then be dragged onto the video pane of the timeline.

the next step would be to select the adjustment layer and then go to "Effect Controls" which would bring up a window where you could alter the opacity and blend mode for the new adjustment layer, then you could either alter the adjustment layers initial settings or drag any effect onto the layer to then alter that to suit your needs, as each effect that is dragged onto the adjustment layer would show up in the effect controls menu.
 |
| The effect controls menu that shows all of the adjustments that can be made |
 |
| As an example I used the warp stabiliser effect which then showed up on the effect controls menu of the adjustment layer |

Thursday, 13 June 2013
Music Video - Bin Labelling
Before I could start editing the footage for my music video I first needed to organise and label the Bins that held the footage so I would know exactly what piece of footage it was and where it was stored to make the editing process easier.
 |
| I decided to organise all of my footage from each shoot into a folder and label it so I knew which folder had the correct footage inside, and from each shoot I performed. |
 |
| This is the shots inside the folder labelled "Main Shots" which holds the bulk of the footage I will be using during editing, I changed the name of all of the footage which I would be using to something recognizable such as using simple words and numbers that would separate the shots. |
 |
| This is the second folder labelled "Main shots 2" which holds all of the footage taken from a different day and I have labelled each piece of footage in a similar way to the previous folder in order to recognise it during editing. |
Thursday, 18 April 2013
Promotional Video - Final Film
Original Sin Promotional Video from Lewis Mercer on Vimeo.
This is the final edit of my promotional video for the Original Sin Tattoo studio
Thursday, 11 April 2013
Promotional Video - Bin Labelling
During the production of my promotional video I needed to organise and arrange my footage so that it could easily be located and arranged during the editing process, as without renaming the footage or without placing it in an easily accessible location would prove difficult for me to edit it together.


 |
| This is a shot of the folders where i would be storing all of my footage I labelled them according to the room I was in in the tattoo studio during filming |

 |
| These two shots show how I renamed and labelled all of the footage from the first film shoot to make it easier to locate and categorise for future editing, I separated them all into groups and named them accordingly, mostly to describe what the shot was showing. |


 |
| These three shots are from the second shoot and I followed the same process as the last time, I renamed the clips according to what they were showing as a way to organise them for easier access. |

 |
| These two shots are from when I was actually filming the process of a tattoo being done however since it was in the same room as the last shoot I simply decided to slightly alter the name of the folder. I tried to organise all of my shots with labels and numbers so they would be easy to distinguish between during the editing process. |
Friday, 1 February 2013
Wednesday, 30 January 2013
Psychoanalytical - Bin Labelling
During the production of my psychoanalytical film one thing I needed to do was label all of my footage so that it would be easily accessible during the editing process, as would need to quickly locate and distinguish between different shots whilst editing.


All of these shots show the process of how I renamed all of my footage to something recognisable and easily accessible so that during the editing process I could quickly use the footage I needed during editing, also I kept all of the footage within a single folder so that I could easily find all of it and it would all be instantly available to me when editing, since I would not have to search through different bins on the editing software.


All of these shots show the process of how I renamed all of my footage to something recognisable and easily accessible so that during the editing process I could quickly use the footage I needed during editing, also I kept all of the footage within a single folder so that I could easily find all of it and it would all be instantly available to me when editing, since I would not have to search through different bins on the editing software.
Monday, 26 November 2012
New Wave Film-Final Product
New Wave film from Lewis Mercer on Vimeo.
This is my "New Wave" film that I created from the footage we had gathered over the various different shooting sessions over the course of this unit, I tried to use various different New Wave techniques within this like quick cuts, innovative camera movements and lighting.
Wednesday, 21 November 2012
New Wave Footage -Bin Labelling
Before I could start work on my New Wave film the various footage I had gathered needed to be properly labelled and organised so that whilst editing it would be easier to find all of my footage and arrange it easily.


 |
| This is my footage from the first shoot we did, I labelled the folder its all in "New Wave footage 1" |

 |
| These next 2 screenshots are from the second shoot where I labelled all of my footage and also labelled the folder "New Wave footage 2" |

 |
| These next 2 shots are screens of the final folder full of footage which I labelled "New Wave footage 3"
These screenshots show all of my footage after it was labelled and organized in order for me to easily find it whilst I'm editing my new wave film.
|
Thursday, 25 October 2012
Continuity Editing: Shot Reverse Shot
Continuity editing is the connecting of action in different locations during a film sequence and it uses techniques such as the 180 degree rule and shot reverse shot, these techniques help show parallel action thing lace in different locations in a scene and cross cut between each other to give a scene a sense of narrative. One of the earliest directors to understand these editing techniques was U.S director D.W Griffith who mastered the use of cross cutting to create parallel action in different locations and codifying film grammar in other ways. His work during 1913-1919 was highly regarded as being a great influence to peoples understanding of early editing techniques.
This footage is our attempt at creating the shot reverse shot effect while applying the 180 degree rule, we shot this footage in order to edit together at a later point as a means to practice our skills and understanding with continuity editing techniques. These two pieces of footage show how by moving the camera to face each subject then, if edited together it would seem like a natural conversation between the subjects and the camera would focus on each subject as they were speaking.
Continuity 1 from Lewis Mercer on Vimeo.
Continuity 2 from Lewis Mercer on Vimeo.
This footage is our attempt at creating the shot reverse shot effect while applying the 180 degree rule, we shot this footage in order to edit together at a later point as a means to practice our skills and understanding with continuity editing techniques. These two pieces of footage show how by moving the camera to face each subject then, if edited together it would seem like a natural conversation between the subjects and the camera would focus on each subject as they were speaking.
Continuity 1 from Lewis Mercer on Vimeo.
Continuity 2 from Lewis Mercer on Vimeo.
Monday, 22 October 2012
Filming for Editing: Kuleshov Effect
During the time in the studio the main aim was to film film footage that we could use for practicing editing techniques such as continuity editing and the Kuleshov experiment. Firstly we started by filming a shot of our subject and then shot three different subjects/objects in order to edit together to replicate the Kuleshov experiment, The footage would be edited in a way that the shot of the subject would be intercut with shots of the three different subjects/objects and would cut back to the exact same shot of the first subject, this is to show that through editing the same shot when shown in juxtaposition with different things can communicate various meanings to the audience.
The above images are shots taken from the footage that we would be using, each shot of an object is going to be edited to be intercut with the shot of the subject to replicate the Kuleshov experiment to create meaning from the juxtaposition of different images wit the subject even though the shot of the subject remains unchanged. During the filming process we attempted to try and use similar objects/subjects as in the original Kuleshov experiment one example being Shot 4: Object 3, the bowl of soup.
The footage below is all of these shots intercut with each other to create an imitation of the Kuleshov experiment to give different meaning to a single shot through the use of what context is given with it through the image that is intercut with it.
Kuleshov effect full from Lewis Mercer on Vimeo.
 |
| Shot 1: Subject |
 |
| Shot 2: Object 1 |
 |
| Shot 3: Object 2 |
 |
| Shot 4: Object 3 |
The above images are shots taken from the footage that we would be using, each shot of an object is going to be edited to be intercut with the shot of the subject to replicate the Kuleshov experiment to create meaning from the juxtaposition of different images wit the subject even though the shot of the subject remains unchanged. During the filming process we attempted to try and use similar objects/subjects as in the original Kuleshov experiment one example being Shot 4: Object 3, the bowl of soup.
The footage below is all of these shots intercut with each other to create an imitation of the Kuleshov experiment to give different meaning to a single shot through the use of what context is given with it through the image that is intercut with it.
Kuleshov effect full from Lewis Mercer on Vimeo.
Wednesday, 17 October 2012
Filming for Editing: Evaluation
After this session in the studio filming in order to practice editing techniques I've found that when shooting in low key lighting it's very difficult to get the right amount of light that is needed to provide an acceptable looking shot, as during filming I found that without the correct amount of light or a poor backdrop creates a variety of problems such as the background being too reflective or shadows covering the entirety of the backdrop. However I've also found that when filming for editing specific things need to be considered such as the 180 degree rule as it was a trial to get the framing just right whilst using the 180 degree rule although it did provide decent footage and in addition filming to create the Kuleshov effect was taxing as we constantly had to adjust our cameras and equipment, the backdrop or the subject and we had to use long takes to provide us with enough footage to give us as many options as possible for when we edit the footage together. This filming session was basically an experiment to practice filming footage with which we could then practice our editing skills by shooting certain things that wold be required to edit using different effects such as the Kuleshov effect and the 180 degree rule, which we tried to replicate as accurately as possible e.g. using similar objects used in the Kuleshov experiment such as a bowl of soup to intercut with a shot of our subject.
Overall aside from a few minor problems during the process we have managed to get decent footage which we can now use for editing later on to provide examples of the 180 degree rule and Kuleshov experiment, which we could then utilise for other pieces of footage that could provide us with better quality film that looks appealing and provides narrative.
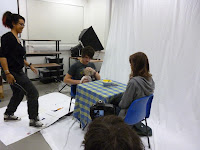
These are shot taken whilst we were filming to show our process.


Overall aside from a few minor problems during the process we have managed to get decent footage which we can now use for editing later on to provide examples of the 180 degree rule and Kuleshov experiment, which we could then utilise for other pieces of footage that could provide us with better quality film that looks appealing and provides narrative.
These are shot taken whilst we were filming to show our process.


Subscribe to:
Posts (Atom)